Showing posts with label treats. Show all posts

Tuesday, December 17, 2013

Cranberry Orange Loaf (Grain/dairy/gluten Free and Paleo)


My photos are not the greatest at giving this cake/loaf what it deserves. This is by far my favorite paleo baked good I have tried so far. Very yummy and it's not even noticeable that it's grain-free! 


Mackynzie devoured this, and told me it was 'super delicious' It was really easy to throw together, and absolutely something you could bring to a family gathering. 

Let me know how it turned out if you try it!  


Saturday, March 16, 2013

Paleo Banana Walnut Bread


 I started Paleo baking again. The good thing about paleo baking is that once you get the hang of it, everything follows similar principals, so unlike regular baking you can create your own recipes. 


 The verdict? This was good. It's mild and sweet and has good consistency and shape. However, I personally don't love coconut flour in my baking. I don't know, it's a texture thing for me. I am going to start baking with almond flour, because I feel like It would have a closer texture to what I am looking for. Despite all this, it was good, so go HERE for the recipe. (To spare me from having to re right it) I used walnuts instead and 3 bananas.

 Happy Saturday everyone!

Do you like coconut flour??

Sunday, September 2, 2012

Chocolate Almond Freezer Bites


 This is one of Mackynzie and I's favorite treats. The bonus is that they are loaded with healthy fats and take almost no time to make. They are creamy, delicious, and you could replace the chocolate almond with anything, really. This is especially good for you pregnant mamas out there! 

Put almonds  in an ice cube tray.


Melt about 2 tablespoons (actual spoon) of coconut oil on the stove. (just until its melted!) and use spoon to pour oil over almonds. about half way up the almond.


Throw in freezer and they are ready in as little as 40 minutes.


Pop out of ice cube mold and put into bag or jar and put back into freezer.


 Snack on a couple a day and be prepared to always have these in your freezer.

Friday, August 31, 2012

Healthy Soft Serve


When it's hot and my sweet tooth goes nuts, this is one of my favorite quick things to make. Mackynzie goes bananas over it. It takes two seconds and is only 3 ingredients; frozen banana(s), cocoa powder, and a tiny bit of canned coconut milk (I added a little bit of vanilla). 


Om nom...

Wednesday, June 20, 2012

My version of vegan 'yogurt'


 I was looking for a quick, light snack or breakfast for those mornings when Mackynzie or myself just don't feel like eating much. I wanted it to still be nutritious and I soon found myself dreaming of being able to eat yogurt. It was the perfect solution in my mind, but the whole dairy thing was an issue. Then I remembered my love for coconut milk, and the versatility of coconut 'whip cream'. And with that, I give you:


 Rainbow's vegan 'yogurt'

I make them in single containers, so they are one serving. You can tweak the recipe to suit your desired serving size.


  • 1 can full fat coconut milk
  • 1-2 tsp (actual teaspoons you eat with) Organic jam OR purred/mashed fruit
  • 1-2 tsp organic apple sauce (if you want some texture. skip if you're looking for completely smooth.)
  • 1 single-serving container with lid
shake your coconut milk really well. you want to incorporate the water and cream. skip this step if you want a thick, Greek-like yogurt. If you want it thick, do not mix can. open and scoop the 'cream' out and save the water for another purpose.
 Make sure your coconut milk is well whipped (by either shaking or whipping with fork. especially if you are seperating it from the water.)

Pour into container. Add 1 teaspoon of jam and 1 teaspoon of apple sauce and mix well. taste, and add more if desired.

pop lid on and leave in fridge for preferably one day.

Enjoy!

I love that this has the consistency and creaminess of real yogurt. Its also super versatile as you can literally put any sort of fruit you want into it.  Also, how easy is that?!

Coconut milk is packed with awesome nutrition, so sit back and enjoy eating/feeding your little knowing you aren't filling up on 'nothing'!


Saturday, June 2, 2012

Oat Flour... Where have you been all my life?


 I have been learning a lot lately. Isn't that how it always goes?

One of the things I learned today makes me very happy... because seemingly odd things can make me giddy.

 Oat flour.

Grind up oats (regular, not quick.) and replace it in any recipe that calls for flour. It has a sort of light nutty taste, but it's very delicious and works very well! As a family who strive for gluten free options, this is a very awesome thing to know. I feel much more relaxed knowing i can throw some oats in my blender, rather than scouring the stores to find alternative flours that aren't always nice on the wallet. You can bet I will be baking with this from now on! not to mention how much healthier it is in comparison to the standard options. (hello fiber?) 

I baked with it for the first time this morning. I made simple gluten/dairy/egg free banana muffins for Mackynzie, okay... and for myself, to enjoy. they were a hit! I even think Cody will like it when I make him something without bananas in it.


Oh ya, putting your baking ingredients in a blender is awesome. Some of you may be thinking that this was so last year and I should know this, but hey, better late than never!

Saturday, February 18, 2012

Banana-Chocolate Chip Paleo Muffins (Or just Banana...)


 Paleo muffins?! No way!

Don't be so shocked! Some of us on the caveman diet still love to bake! (I have quite a few baking recipes that I will be posting asap!!)

For those of you who were not shocked, and just want me to get to the dang muffins already, here we go:

Banana-Chocolate Chip Paleo Muffins (Or just Banana Muffins...):


  • 2 large size eggs
  • 4tbsp Melted coconut oil, or butter
  • 2 1/2 tbsp maple syrup (add a bit more if you are not using chocolate chips. if you don't like sweet things all that much, don't add any. Or, add more if you like. OR you can use honey (if you don't have little ones under/around 1 year), or other natural sweeteners.)
  • 2 pureed over-ripe bananas (I have a bullet, so I just popped them in there, and made them smooth. You can do this with a blender, OR you can just hand mash them. I didn't want any lumps of banana this morning, so this is just what I did!)
  • 1/2 tsp baking soda
  • 1/4 tsp crushed sea salt
  • 1/2 cup coconut flour
  • handful of chocolate chips. (eye-ball it. You know what you like.)
  • Nuts, if you like them. (we don't bake with nuts often, so we don't add them.)

Directions:

There are two ways you can do this. 

 1 - put everything in bowl and mix.

2 - (what I do.) Crack eggs into your bowl, and give a light whip so they are somewhat combined. Add your syrup and *melted* coconut oil/butter - give a little whip again to combine.
  Add your banana puree or mush (or, if you are not pureeing them, just put them in the bowl and mash them with the eggs etc in there... Or do it separately, its completely your call.)  and give a little whip to combine it all again.
 Sift in your coconut flour, then add your salt, and baking soda - mix with wooden spoon until combined.
Add your chocolate chips and/or nuts if you're adding them.

Preheat oven to 350.

use ice cream scoop, or spoon, to scoop a big dollop of batter into a **greased** muffin tin. (or use cupcake liners.)

Bake for 28-30 mins. Cool, pop out and eat them all... 

TIPS AND EXTRA INFO:

  • If you have baked plaeo-style before, you will notice that I only use two eggs. This may confuse you, as paleo baking usually requires 6+ eggs. Worry not, this is not a typo. I have been playing around and making dozens of muffins to find the right consistency. I think I found it. (don't hold me to this yet, as I need to try and do a recipe without chocolate chips first, to see if what I did was right!)
  • If you have baked with coconut flour before, you will noticed the muffins tend to come out mushy. This one is not mushy. (see above bullet.)
  • These muffins don't rise, So fill your tins appropriately.
  • The bake time is quite long for muffins, but they are mushy if you don't wait it out. Some ovens may be done in 17 mins, but I have a hot oven, and I leave mine in for 30 mins, or else i find my centers are just too moist.
  • These freeze well, so make some, and freeze them!
  • Paleo muffin batter doesn't make as many muffins as you may be used to, with wheat flour. Don't be fooled, these are FILLING because they are packed with so much goodness. Just 2 of these bad boys with my tea or green smoothie, and I am stuffed for breakfast! 
  • Some people may be going "whoa, Rainbow. Chocolate chips are NOT paleo." -This is true. But, a little dark chocolate is A-okay in most paleo eyes, and you can get vegan/gluten free chocolate chips. (these in particular, are just normal chips. We don't always sweat the small stuff, and we are not crazy strict, so this is okay for us. It;s not like it's all the time ;) )


Eat, and enjoy! 


Please feel free to ask any questions (I may have let something out, you never know!) and be sure to keep an eye out for more muffin recipes! 


Saturday, December 31, 2011

Sticky Bun Breakfast Ring


**Sorry this is an old post. photos are unavailable now**

   If you are one of those people who look at recipes, and collect them, but never get around to making them, make this one! Its so easy, and so worth it! It's just one of those things you just need to try at least once. It's not healthy in the slightest, and if you count calories, you should probably close your eyes, but man this is a seriously yummy dish.

 I made this for Christmas morning brunch. I didn't want to spend hours slaving away at the stove, when i should be spending time enjoying my family. It was a big hit with everyone, and my father in-law said 'It's a great break from pancakes etc.'.  I loved it so much, i made it again yesterday, when I hosted our baby and me group. Again, it was a big hit. So let me share this little piece of ooey gooey heaven with you.


You will need:
  • 2 small tubes of Pillsbury buttermilk biscuits.OR 1 (and only one.) tube of Pillsbury Grands buttermilk biscuits. (it takes too long to bake if you use two grand size tubes.) OR you can just use 2 small tubes of regular Pillsbury biscuits. (country style I think? This is what I used, because they didn't have either of the above options at the store. It worked out perfectly, both times.)
  • 1/2 cup maple syrup (pure is best, but regular pancake will do.)
  • 3Tbsp melted butter
  • 3/4C brown sugar
  • 1/2tsp ground cinnamon
You can also add chopped nuts if you like.


 Grease a fluted pan with some softened butter. You can use a cooking spray too, but in my opinion, butter works better. (and is better for you!)

In separate bowls, combine melted butter, and syrup. set aside. In your other bowl, combine your brown sugar and cinnamon. (mix it well. you don't want to be eating random clumps of cinnamon.)Add your nuts here, if desired.


Pour half of your syrup mixture into the bottom of your pan. Then sprinkle half of your brown sugar mixture on top of it.


Next, layer your biscuits on top of each other. you will want to lay them quite close to each other, since you need to fit two tubes in.


Pour the other half of the syrup mixture on top of the biscuits. (I used a spoon so it was even.) Sprinkle on the rest of your sugar mixture.


Bake at 375F for 20 minutes. (Mine took about 20 mins, maybe 22 or so, and i have a very hot oven. To be safe, set your timer for 15 mins, and check them then. then you can judge how much more time they need.) They should be a nice golden brown, and if you pull one apart a bit, the biscuit shouldn't be sticky and doughy.

 Once it's done, let it cool for about 5 minutes. Flip it upside down onto a serving plate, and serve while its still nice and warm.


Pull apart, and enjoy your amazing ring of awesomeness.

 These actually re-heat really well too. Just pop them in the microwave for 12 seconds, and you have left over breakfast to go with your morning beverage.


Sorry for the poor picture quality. They had to be taken on my phone.
             For the original recipe click HERE


Thursday, February 3, 2011

Pop Tart Recipe

**This post is old- sorry for the removed photos***

Cody LOVES pop tarts. However I hate all the nasty preservatives and artificial sugars and dyes in them. So i found a happy medium; Homemade Pop tarts! I used google to make sure i could use some of the same recipes for other things, and what i already knew to come up with my own recipe.


 Get out a large mixing bowl, a piece of parchment paper, (or a clean lightly floured counter top), a cookie sheet, your favorite preserves/chocolate/Cinnamon and sugar/ whatever you like!,raw sugar if you don't like icing, a spoon(regular), a fork, a metal spatula/butter knife/anything along those lines,beaters (or a wooden spoon if you would like to do it by hand), 1/2 cup measure, and 1 cup measure, flour, sugar, butter(softened), salt, and milk.


Now your ready to go!


In a large bowl, combine 2 cups of flour (don't level them out, let them be a little over 2 cups), a pinch of salt, about 1/2 cup of butter, 1/2 cup of milk, and a handful (or for those who like to measure, about half of your 1/4 measure) of sugar. You don't have to add sugar and you can add as little or as much as you like. This makes the dough slightly sweet. not too much, not too little. This recipe is very forgiving, so that's why i haven't given exact measurements. This is my recipe for pie crust.

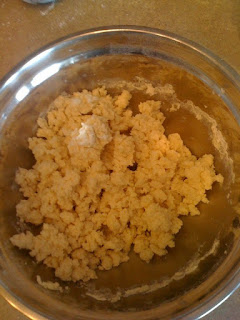
 After you mix it, you get something like this.


 Wash your hands (if you haven't already!) and scoop your dough up and form it into a ball. Work with it for a minute or to to make sure it is together well.


 Break off pieces and form little balls approx. 2 1/2 inches. This gives you a chance to work the dough a little more thorough. You should get six balls.

Wrap each ball individually in Saran wrap an put in the fridge for an hour. Personally I make the dough/crust the day before and leave them in the fridge over night, so i can make them in the morning. You can even leave them in the fridge for up to 2 days.


Once your dough has sat, warm it and work it with your hands. Form it into a rectangular shape like so. As you can see, it doesn't need to be perfect! Now would be a good time to pre-heat your oven. Pre-heat your oven too 400 F.


Roll out your dough and try to maintain your rectangular shape. I use my fingers and hands when I'm done rolling. Also i realised i don't have a rolling pin (what the heck?!) so i used a long container!


plop 2 table spoons approx. (again this is up to you) of your favorite jam/chocolate(chips work too)/ Cinnamon and sugar/ whatever you like on the middle, bottom half.


Fold top half over and match up sides. press them down around your pocket of jelly or whatever you used.


Use a fork to press along the edges to give it that 'pop tart' affect. Also poke holes in the top for vents.


Use a metal spatula, knife, or whatever else you have handy an cut off a *bit* of the edges to make them square.
Add raw sugar here, if you don't like icing.
Place on floured baking sheet and pop in the oven. (don't worry about the distance away from each other because they don't grow.)
set timer to about 17 Min's. my oven is hot so i go by 17. anywhere from 15-25 will be good. you want them to be golden around the edges and bottom. don't try to guess from the way the top looks or your bottom will burn!


 While those are baking, i make icing. you could also use raw sugar and put it on before you put the in the oven.

ICING:
 this is very rough as i don't measure this, but its pretty close!

melt 2 tbsp of butter. (stove or microwave) add about a tbsp of milk, and add icing sugar until thick (how thick is up to you i would say about 1/2 cup- 1 cup but just add slow) use food coloring to color your icing if you like.


Once done, add icing and sprinkles if you like (or if you used raw sugar then your done) its okay to add icing while still warm. i do! serve, and enjoy!

I store mine in an air tight container but not in the fridge. you can refrigerate if you want. i like them room temp. to snack on with milk.